Sunday, January 31, 2016

Genealogy Do-Over 2016 - Month 1 Update


Today is Sunday, January 31, 2016, and it's the last day of Month 1 of the Genealogy Do-Over for 2016.  The topics for this first month was 1) Set aside previous research, and 2) Prepare to research.

The first thing I needed to do was to start out with a cleaned off work space.  My computer desk isn't very big, so it's imperative to keep it clear of things that I'm not currently working.  It's very easy for it to get cluttered with my genealogy, crocheting (I crochet while I watch Netflix on my computer), bills, and anything else that I can work on while sitting at my computer. Here is the status of my work space right now.  The only thing on it besides my computer, is a pen/pencil holder and my copy of Evidence Explained.

As I mentioned in my last blog post, all of my previous research has already been set aside because I was a participant in Genealogy Do-Over that took place in 2015.  Since I started my journey into researching my ancestors in 2010, I really didn't have a lot of papers because I decided to keep things digitally.  Here is a picture of all of my research papers that I do have in a pile next to my computer desk.  See, I told you that I didn't have much.  Most of the paper in that stack is locale research, and some papers that I've inherited from family that did some research in the past.

Another task I took care of this month, which I think falls under preparing to research was to get a handle on my inbox in Outlook.  I will admit right here and now that my email box was a total and complete disaster.  I must have had over 2,000 emails sitting in my inbox.  A while ago, I sat down with the thought of organizing my emails, and I made up folders and subfolders for emails that I wanted to save.  But still, I managed to have over 2,000 emails in my inbox.

Because of my work schedule, I don't always turn on my computer during the week.  Now that I have a smartphone, I can and do (at times) check my email that way throughout the day.  Doing it this way did help in I knew that whatever emails were still there were ones that I wanted to keep for one reason or another.  I don't usually read the emails in depth.  I just do a fast scan of the email.  So what I did, was sit down to my computer and read each and ever email to determine which ones I wanted to keep and I also made up some rules within Outlook so that certain emails would automatically go into a specific folder for reading later.  I soon discovered that the Rules working is really a hit or miss proposition.

Click to view full-size image
After I cleaned out my email, I decided to take a pic as it had never been that cleared out before. Here's the view of my cleaned out Outlook Inbox as of Jan 09, 2016.  I'm also proud to report that as of today, I only have 36 items in my inbox that I need to review and decided if it can be read and deleted, or if I want to keep it for future reference.  If I decide that I want to keep it, then I'll move it over to a folder, or make a folder for it.


I also want to share with you the types of folders I made up, especially for my emails relating to genealogy.  There are quite a few blogs that I follow via email.  I also receive quite a few genealogy-related newsletters.  I wanted folders for each of them.

One last thing to wrap up January 2016 is a change in my research process (there have been many since I started this do-over in January 2015).  My plan is to use Evidendia, Microsoft OneNote, and Family Tree Maker for all of my research and building my family tree.  I started a brand new tree in Family Tree Maker called LusbySporie Family Tree (2016), and I also started a new database in Evidentia called LusbySporie_2016.

Here is a brief outline of my original plan on how to use these three pieces of software in my research.

Evidentia

This is the first step for any record I find on the ancestor I'm currently working on.  For any source/record I find, I create a new source to document.  Then I create the citation and catalogue all the claims that I can find on that record.  Once these first two things are done, I can then analyze the records and write my conclusion. My plan is to touch each record only once.  So if I'm working on a census records for my grandmother, I'll also be cataloging claims for every member of that household.  That way, when I move onto the next ancestor in that line, all of the claims have been entered, and I'll just have to create a new citation for that ancestor.  I will be making a blog post showing step-by-step how I use this piece of software.

OneNote

Initally, I was going to use OneNote as my catch-all for my research - a way to keep everything in order, and also a way to analyze all the records I find and a way to write up my conclusions in a proof report.  Turns out, Evidentia is where most of this process will happen.  If I then used OneNote in the same manner, I'd just be duplicating my work.

So I needed to make a change on how I was going to use OneNote in my research.  Now it will be where I keep my family group sheets, write-ups on the locales where my ancestors lived, and other research I find along the way.  I will also be keeping my research long here.  I'll one one for each family unit.  I will be making a blog post showing step-by-step on how I'll be using this software in my research.

Family Tree Maker

Right now my plan is not to put any record into my database until I have been able to prove to the best of my abilities using Evidentia and OneNote that this ancestor is my ancestor.  Once I have been able to prove they are, then into FTM will go all the documents, sources, citations, proof reports, and notes.  When that ancestor is complete, then I will move onto the next ancestor.

UPCOMING ATTRACTIONS

The second month of the Genealogy Do-Over starts tomorrow, and the topics for the month are:

  1. Establishing Base Practices and Guideline
  2. Setting Research Goals

Sunday, January 3, 2016

Genealogy Do-Over 2016 - Month 1


If at first you don't succeed
Try, try again


I can't believe that I haven't posted in this blog since April 5th, 2015.  Where does the time go?  It seems like the older I get, the faster the days and months go by.  The last post I made was about the starting the second cycle of Thomas MacEntee's 
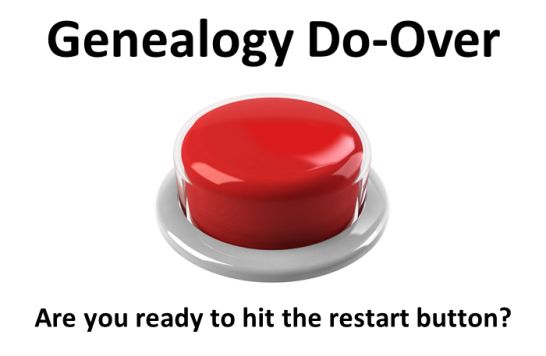
Genealogy Do-Over, which, according to Thomas, is "a success-driven program created to improve your genealogy skills.  Learn the latest technologies, tools, methodologies and more so you can share genealogy research with your family."  In 2015, the Do-Over was a 13 week course.  Starting in 2016, the Genealogy Do-Over is now a year long course, with the topics broken out monthly.

In Cycle 1 of 2015, I managed to get up to Week 4.  Then in Cycle 2 of 2015, I'm not even sure how far I got,  I don't think I got much past Week 1.  The reason for this, well the initial work plan I set up in Week 1 didn't quite work the way I hoped it would when I set it up.  So I made some tweaks, and started again.  Again, I found some more tweaks were needed to my system. I figured it was best, at least for me, was to stop what I was doing research-wise, and fix something that wasn't working at the time I discovered it.  Then I'd go back to my research to see if it worked with the way that my brain works.  Many months later, I think I finally have it working the way I want I want it to.  Now I am ready to jump in and start my Genealogy Do-Over once again.

With the year, the year-long Genealogy Do-Over started on January 1, 2016.  The very first thing I did was purchase the Workbook that Thomas created.  I bought the PDF version, and have it saved to my computer.  The topics are broken out over the 12 months of 2016.  With participating in the Do-Over last year, I have already worked though some of the earlier topics.  My plan is ti still address each month's topic(s),  Since we are at the beginning of January, I start with Month 1.

The topics for Month 1 are (1) Setting Previous Research Aside, and (2) Preparing to Research.  I'll address each topic separately.

Setting Previous Research Aside

There isn't much for me to do with regards to this topic because all of my previous research had been set aside when I originally started the Do-Over in 2015.  I didn't have much in the way in paper files because I didn't start my genealogical journey until 2010.  When I did start back then, I decided to keep all my research digitally.  I do have a few original vital records in paper format.  They are scanned and on my computer, and the paper copies are put away in a folder.  All of my old electronic files were "put away" in a hold file on my computer, and I pull them out as I need them.  They are saved in my new file system, and the old electronic file is then deleted.

Preparing to Research

When I first saw this topic, I have to admit that I thought it was a bit strange.  Who knew that you had to do "prep-work" before you started researching.  When I first started researching my ancestors, I just dove in and started inputting names into Ancestry.com with no rhyme or reason and saved any results that I found.  I didn't really analyze the information on the records that I found.  I assumed it was correct.  It took the information I found on all the family trees that are out there on the internet the same way.  Boy, have I come a long way since those early days.

Before I get to my general plans for research, I wanted to share some of the tools and software that I am currently using:  Evidentia, Microsoft OneNote, and Family Tree Maker.

Evidentia

This software was created and developed by Ed Thompson.  Evidentia is a database, but not person-centric like Family Tree Maker, RootsMagic, and Legacy is.  Evidentia is source-centric, and it helps you analyze the evidence you find on your ancestors.  Evidential is used to compile, evaluate, and analyze evidence.  This software allows you to look at each record you collect on a specific ancestor individually and in relation to the other records collection, and it also helps you reach a sound conclusion.  You can use this software for each and every person that you are research, or you can use it only for those ancestors who are your brick walls.

When I first got the software, I was planning on only using it for my brick-wall ancestors, which I have quite a few of.  When I started the genealogy do-over last year, I decided that I was going to use it for each and every ancestor in my tree.  While it's a daunting task, I think it's well worth it for me, mainly because of the citations I can create, which will then be copied over my genealogy database.  In future posts, I'll share screenshots of how I am using Evidentia in my research.

Microsoft OneNote

I'll be using this nifty piece of software in place of Evernote.  This where where I kept getting help up in my previous attempts in completing the Do-Over last year.  I wanted my set-up working like a well-oiled machine because this was the last stop before any information/records would be put into my genealogy software.

While I like Evernote quite a bit, it just didn't quite work like my brain works and I couldn't set up my notebooks quite like I wanted to.  OneNote does.  I've gone through many set-ups for my individual notebooks...alot of trial and error to see what worked and what didn't.  Then I came across Erin Klein's blog, My Family History Files, and she showed how she used OneNote for her genealogy research.  After reading her posts, I found this was exactly how I wanted to and was trying to set up my notebooks.  She has two different notebooks for two different ways of using OneNote for genealogical research - (1) Surname Notebook - Sources Sorted by Record Type, and (2) Surname Notebook - Sources Sorted in Chronological Order.  I opted to use the first one as my records are sorted by record type in the individual surname file folders.  In future posts, I'll share screenshots of how I'm using OneNote in my research.

Family Tree Maker

Family Tree Maker (FTM) is the first and only genealogical database software that I use, and I love the software.  When I first started research, I only had a tree on Ancestry.com.  Then I purchased FTM 2012 and then 2014 when it was released.  I know about Ancestry's decision to stop supporting this software at the end of 2016, but I'll keep using it until it doesn't work on my computer any longer.

While FTM will continue to my where I maintain my tree, I  also plan to experiment with a free version of Legacy.  That way, when and if FTM stops working, I'll have another current, up-to-date tree with sources and citations.

I also have memberships to MyHeritage and Find My Past.  I'm keeping my tree on these sites also.  My Heritage has a free genealogy database that can be downloaded to your computer that also syncs to their site.  Find My Past is online only.

No ancestor or record is added to FTM until they have been fulled vetted by the steps I take in Evidentia and OneNote.  This way, I know that if a person is in FTM it is because I have proved to the best of my ability that they are an ancestor of mine.

In future posts, I'll share screenshots of how I'm using FTM in my research.

Electronic Filing Structure

This topic could most certainly be included as a subtopic under Preparing to Research, but I think it's an important enough topic to be on its own.  How I file my electronic records on my computer has gone through many iterations.  I believe in making it as easy as possible to find records on my computer, and that when I look at a file in the directory, that I know exactly what file it is that I'm opening.  That is why I tend to be very exact in naming my files.  Here are some screenshots on how my files are set up on my computer.

This first screenshot is of the main screen when I have Windows Explorer open and click on my F: drive, which is my main data drive that I use.  All of my genealogy files are set up in the Genealogy 2016 folder.  I have also set up a library called Genealogy 2016.  This library is an exact copy of my Genealogy 2016 folder on my F: drive.  The library is the easier of the two to get to.  Anything that I save to the library is also saved to the F: drive and vice versa.

Click to view full-size image
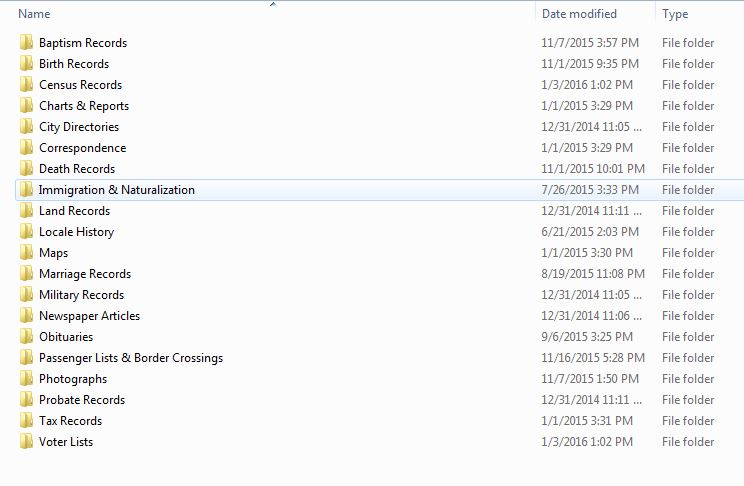
When I click on Genealogy 2016, these are the files that I have made to organize my work.  Of course, the most important folder is my Surname folder, hence the reason why it is at the top.  I won't go into an indepth reasoning for the folders I set up, but if you are curious and what to ask, just leave me a comment and I'll answer.

Click to view full-size image
Below is a screenshot of my Surname Folder.  I have each surname color-coded as follows:  Blue -My Dad's Paternal Line; Green - My Dad's Maternal Line; Red - My Mom's Paternal Line; and Yellow - My Mom's Maternal line.  The reason I have the numbers in parentheses is so that all of each color stays together.  Otherwise, they would just sort alphabetically.  This way, all the blues, greens, reds and yellows stay together, and they also sort alphabetically.  I find this the easiest way to organize these folds, and the one that makes the most sense to me.

Click to view full-size image
Here is a screenshot of my Tanton Surname Directory.  When sorting, Microsoft sorts alphabetically, so I set the these files up to sort by generation.  So 01 is for my great grandfather, 02 is my 2x great grandfather, and 03 is my 3x great grandfather.  If I had a grandfather on this line, he would have been 00.  My maternal grandmother is from this line, so her records up to her marriage can be found in her father's (Jarvis Pope Tanton) file.  Even though this is the Tanton Surname Folder, I opted to still use the surname first in naming each ancestor as well as using their birth and death years in parentheses.  This helps for the same names being used generation after generation.

Click to view full-size image
When I first started keeping all my files electronically, I wasn't quite this detailed in my file structure.  After I developed the subfolders, I found it much easier to find the records that I have saved to my computer.  I have a master Subfolder Directory that I use each time I start a new surname, I immediately copy the below file folders over to that surname.  As I find I need it, I add folders to this Subfolder Directory.

Click to view full-size image

Last but not least is how I name my files/records that I save.  My naming structure is as follows:

Surname_FNameMName_Date/Year of Record_Record Description

Here are a couple of examples based on the above structure.

TANTON_JarvisPope_1921_CanadianCensus_PEI_PrinceCo_Summerside.jpg

TANTON_IsabellaSharp_1909-04-13_BaptismRecord.jpg

TANTON_IsabellaSharp_1925-06-27_Maine_CumberlandCo_Windham_(Sporie).jpg

So there you have it.  My new beginning for tracing my roots in 2016.


Sunday, April 5, 2015

Genealogy Do-Over - Cycle 2: Wash, Rinse, and Repeat


way to start your genealogy research over.
At the same time,  you will learn how to build a solid
family tree with good, strong roots.
* * * * * * * * * * * * * * * * * * * * *
The last time I posted about my progress in the Genealogy Do-Over was back on February 28, 2015. I had just completed Week 4, and was getting ready to commence with Week 5.  This was about the time that we were in research mode, utilizing the tools that we had set up in the first three weeks.  I found that it's one thing to visualize your workflow and set up tools to aid you in your research and something totally different when you go to actually use them.  While everything worked pretty good, I found that some weren't working smoothly and were time suckers.  So I stopped researching and started tweaking everything.  Tried out those fixes, and tweaked again.  Wash, Rinse, and Repeat

So before I knew it, the 13 weeks were up, and it was over.  It wasn't long after I started this journey back in January, that I knew this Do-Over would take me longer than the 13 weeks prescribed by Thomas MacEntee, and I was perfectly okay with that.  As of Friday, April 3, 2015, Thomas started this process all over again.  Like me, he must be a glutton for punishment.  Signed up for this second cycle are those that lurked during the first go-round, those that participated and finished, and then there are those like me, who got behind but plodded along at their own speed.  Nothing has changed, it's the same topics as before, but now I think I'm a little wiser and am more aware of my shortcomings and where I need more work.  While the first four weeks should be a bit easier for me as those are the weeks that I've completed, it will be the other nine weeks that will present more of a challenge for me, but I think I'm up for the task.  My main goal this go-round is to stay on schedule, and to try and work on this at least one hour a night.  During the weekends, I can spend as much time as I want on this.  It's during the work week that is a challenge for me because of my schedule.  We will see how it goes.

So what's up for this first week of Cycle 2?  The same topics from Cycle 1:  1) Setting Previous Research Aside, 2) Preparing to Research, and 3) Establishing Base Practices and Guidelines.  If interested, you can read my post detailing what I did regarding these topics in Cycle 1.

Here is my plan for Week 1 of Cycle 2:

Set Previous Research Aside

On the first go-round of the Do-Over, I put all of my spiral notebooks and loose papers in a nightstand drawer that I have next to my computer desk.  I was hoping that out-of-sight-out-of-mind would work, and it did.  I didn't touch anything in there.

Then I tackled my electronic files.  I started working on my genealogy in April 2010, so almost everything I have is electronic.  I renamed my Genealogy folder to Genealogy Do-Over Hold File. I then created a new folder called Genealogy 2015 and created the following subfolders - !Surnames, Forms, Genealogy Do-Over Group Files, and Subfolder Master File.  I didn't move over any documents/files from my newly created Hold File.  I was truly going to start over with a total blank canvas to work from.

I also started a new database in Family Tree Maker and Evidentia, as well as creating new notebooks in Microsoft OneNote.

Prepare to Research

This time, I created some additional folders in my Genealogy 2015 folder, and they include: Calculators, Maps, Publications, and Research Tools.  Then I went into my Hold File, and moved over some files.  As I did this, I realized there were some things that I had more than one copy of.  Lots of duplicates and even some triplicates.  Below is a snapshot of my Genealogy 2015 folder along with the subfolders I've created so far.

Click to view full-sized image.
Since I'll be spending the majority of my time in my surname folder, I used the exclamation point as the first character of the folder name so that it is always at the top of the list of folders. As for how I have my surname folder set up, I'm starting with my four grandparents.

Click to view full-sized image.
You will notice that in front of each surname I have the following:  01_, 20_, 40_, and 60_.  I did this so they wouldn't sort alphabetically, but instead they sort in the order of my father's paternal and maternal lines and my mother's paternal and maternal lines.  I also colored the folders:  Blue for my father's paternal line, Green for my father's maternal line, Red for my mother's paternal line, and Yellow for my mother's maternal line.  As I continue on to my great grandparents, I can keep the different lines grouped together.  For example, my father's paternal line folders will be named:  01_Lusby, 02_Dameron, 03_Self and they will all have blue folders.  I'm hoping that having 01 - 19 will be enough for my paternal line.  I can always adjust the numbers as I need them, but will cross that bridge when I get to it.

With my paper and electronic files taken care of, I moved onto the two databases that I use in my research.  I have been using Family Tree Maker since 2012 and I'm not changing it.  I upgraded to the 2014 version when it came out.  I like the software and am quite comfortable using it.  I know I'm not using it to it's fullest capabilities, but that is something I can work on.  My original tree is synched to my Ancestry account and is a public tree.  I'll be keeping that tree up for now, and will use the information I have in it as clues for my new tree.  I created a new tree and named it LusbySporie Family Tree 2015.  The only people in that tree are myself, my parents (and sister), and my four grandparents.  It's a private tree right now, and I have it synched with Ancestry also.  Eventually it will be a public tree and will replace my original tree.

The other database that I use is Evidentia.  I've had the software for a while now, but only started to serious use it when I attempted my own version of the Genealogy Do-Over late last year with very little success.I haven't used used it very much as I'm still learning how best to use it.  This is a nifty piece of software, and it helps me tremendously in analyzing my records and creating solid citations (which is a major weakness of mine).  I started a new Evidentia database and called it Lusby_Sporie 2015.  I kept the old database as a reference.

I have used EverNote in the past.  I mainly used it as a catch-all for my genealogy and to track my research.  I was mostly unsuccessful as it just didn't work the same way as my brain does.  I will keep it, but use it to clip genealogy related information when I'm away from my desktop and on my phone/tablet.  Then I can access the information at home.  So I cleaned out all my Evernote files so that I could start with a blank slate.

Other than my FTM database, the other main piece of software that I'm using is Microsoft OneNote. I am using this software for my research plan and log.  I closed all my previous notebooks, and started over with all new notebooks.  This part required a lot tweaking as it's one things to set it up and another to actually use it and hope it works as you planned.  For the most part it did, but there were some things that weren't very efficient and required some rethinking.  Hence part of the reason I never advanced past Week 4 of the first Do-Over.

Establish Base Practices and Guidelines

These haven't changed from when I initially started back in January.

  1. Start with my direct line, and work on one ancestor at a time within each generation (i.e. finish with the grandparents before moving onto the great grandparents).
  2. Don't just collect data on my ancestors.  Get a feel for where they lived, what was going on at the time they were living.  Put them in historical context.  Help them to come alive.
  3. Do an exhaustive search...look into every nook and cranny I can think of to find information that will help me get to know my ancestors.  This includes both online and offline.
  4. Keep a research plan/log for ever ancestor.  Use a detailed research plan for my brick walls.
  5. Be consistent in the naming of my digital files and photos.  Use meta tags.
  6. Complete citations, using Evidence Explained, at the time I save the source record.
  7. No person will be added to my Family Tree Maker Database until I have proven they are my ancestor. This will also apply when I start researching my collateral ancestors.

So there you have it...what I did before and a few of the tweaks I made for this second cycle.  Please let me know if you have any questions or want some clarification.  I'm more than willing to help.  I remember when I first did this.  I was feeling very overwhelmed and had a lot of questions.  I also wasn't sure on how successful I'd actually be.  I just kept plodding along at my own pace, and will keep repeating this process until I have it the way I want it and it works for me.

Just remember, this process isn't a race to see who gets to the finish line first.

Saturday, February 28, 2015

Genealogy Do-Over - Week 4: Managing Projects & Tasks and Tracking Searches


A way to start your genealogy research over.
At the same time,  you will learn how to build a solid
family tree with good, strong roots.

* * * * * * * * * * * * * * * * * * * * *

After taking last weekend and this past week off from genealogy, I’m now at Week 4 of my Genealogy Do-Over, and the topics for this week are 1) Managing Projects and 2) Tracking Searches.  I’m thinking that this post will be short and sweet, and not much prep work will be required to bring this into my research workflow.

Managing Projects and Tasks

I looked over the Project Management Template that Thomas MacEntee shared with us.  While quite impressive and detailed, I don’t have much of a use for it in my research workflow.  All of my Tasks and To Do’s will be kept and traced in OneNote.

Click to view full-sized image.

Tracking Searches

This was something that I have never done, and to be honest, never thought to do.  I think that I’ll actually find this quite helpful in my research workflow.  I can’t tell you how many times I’ve search for the same information for a particular ancestor over, and over, and over again.  So much wasted research times online and in my local libraries.  As part of Week 3, I created a search log based on the Research Log workbook that Thomas shared with us.  When I started my research back up, I made a point to adding all the search parameters I did to the log.  Now all I have to do is review it each times I start to research, and I’ll know immediately where I left off.

Click to view full-sized image.


Well, that’s it for Week 4.  I told you it would be short and sweet.  Now I’m off to review the handout for Week 5, which includes 1) Building a Research Toolbox and 2) Citing Sources.

Sunday, February 15, 2015

Genealogy Do-Over - Week 3: Conducting Research


A way to start your genealogy research over.
At the same time,  you will learn how to build a solid
family tree with good, strong roots.

* * * * * * * * * * * * * * * * * * * * *

Now that I have my research goals and a way to track them created, I am really excited to get to the second topic for Week 3, which is to actually conduct some research.  It feels like forever since I've been able to search for documents.  Below is my attempt to show how I overhauled my way of conducting research based on what I've learned so far from this Genealogy Do-Over.

Click to view full-sized image.
Beginning with my paternal grandfather, Clarence Wesley Lusby, I am starting with his death, and will then work backwards.  Using Ancestry.com, I clicked on Search and selected Birth, Marriage & Death.  I typed in my search criteria, and hit enter.  Ancestry returned with 61 results.  Since I only wanted information on his death, I drilled the search down further by selecting Death, Burial, Cemetery & Obituaries.  This came back with 20 results in the following categories:  (1) U.S., Find a Grave Index, 1600s-Current; (2) United States Obituary Collection; (3) Historical Newspapers, Birth, Marriage, & Death Announcements, 1851-2003; (4) District of Columbia, Select Deaths and Burials, 1840-1964; (5) Minnesota Cemetery Inscription Index, Select Counties; and (6) U.S. Cemetery and Funeral Home Collection. I took a look into each of these categories, and the only one that provided the information I wanted was #3, which came back with his Obituary that ran for two days in The Washington Post and a Notice of Deaths & Services by the funeral home.

Click to view full-sized image.
I opened the notebook I created for him in OneNote, and clicked on the page for Death Records. On the main Death Record page is where my research log is.  I decided to have a log for each research objective instead of one log for everything.  This log is based on the one that Thomas MacEntee developed for his use and shared with us.  I pulled from his log the items that I thought would be useful for me.  I left out the columns for evaluating and analyzing the documents since I'll be doing that in Evidentia.  The columns that I pulled from Thomas' research log are Item No., Date of Search, Proof Point, Repository, Record Type, Image Name, Image Link, and Notes.

I opened the first obituary and saved it to my computer, then I took a screenshot of it with the OneNote Clipper, and the obit went straight to the Obituary subpage.  When I clipped the image, OneNote automatically added the date and time that the screen clipping was made.  I copied the image URL to OneNote, and I also copied the pertinent information that I will use for a citation.  I repeated the same steps for the other obituary and the death/service notice from the funeral home.

I then went to a few other sites that I have access to and performed the same search, repeating the above as I found information relating to my grandfather's death and/or obituary.

As I researched and found documents, I added the search information to my Research Log that is housed on the main page of Death Records.  Below is a sample of my current Research Log for my grandfather's death.

Click to view full-sized image.


Also, as I performed my searched, I entered the information into my Search Log that I use to keep track of my searches so I that repeat them as I did in the past.  Below is a sample of my current Search Log that I'm using to track all the searches I made that pertained to the death of my grandfather.  You'll noticed that a few of the searches that I made yielded no results.  This isn't to say that I will never return to those sites and do another search.  As the sites are continuously updated, some day I might be able to find something there, so I plan to recheck them every couple of months.

Click to view full-sized image.


Since in all of my searches, I couldn't find his Death Certificate, the last thing I did was go to my To List and enter that into the table.  I left the last two columns (Date Started & Date Completed) blank.  Those will get filled in when I send off the order for the certificate and when I actually receive the certificate.  See below for a sample of my To Do List regarding my grandfather death records.

Click to view full-sized image.
And there you have it.  Since I didn't find a reference to his Social Security Death Index in my searching, I'll have to see how to go about getting it.  I'll add this to my To Do List, and research how to get my hands on it.  But this is basically how I plan to go about my search now.  Much more organized that how I was doing it before, and I am hopeful it will keep me on track and keep me from chasing those bright shiny objects I seem to love so much.

Next up is to continue my research on my grandfather, and to move on to Week 4 of the Genealogy Do-Over which covers Managing Projects and Tasks and Tracking Searches.

Sunday, February 8, 2015

Genealogy Do-Over - Week 3: Tracking Research


A way to start your genealogy research over.
At the same time,  you will learn how to build a solid
family tree with good, strong roots.

* * * * * * * * * * * * * * * * * * * * *

Next up on this Genealogy Do-Over journey is Week 3, which is where we start tracking our research and also start conducting research.  Because both of the topic for this week are going to be lengthy, I've decided that I will make two blog posts about the Week 3 topics.

So first up is tracking my research.  In the past, I have been very lackadaisical when it came to doing this.  Because of this, I can't tell how many times I've gone in search for documents, only to discover that I already had that document saved.  So many wasted hours tracking things down that I already had.  I read all the posts in the Facebook group, along with the blog posts that members posted about how they were setting themselves up to be successful at tracking their research.  So many good ideas to try out and see how they'd work for me.

Knowing myself how how my brain likes to work, I've decided to have all of my research in one place - Microsoft OneNote will become my research log.  That way, I don't have to have lots of different documents/spreadsheets for doing various things.  That is a good way for me to lose something, or just get frustrated and lose interest in using those tools.

Here is how I have OneNote set up.  I'm sure that as I actually get back to conducting actual research, I'll be doing some tweaking here and there.  The importing thing is that I have the basic structure set up, and I'd like to share that with all of you.  

I'm going to give you three separate screen shots of the main screen from OneNote to show you how I have my system set up.  Then I'll show you a shot of the entire mail page.

This first shot shows the individual notebooks I have set up so far.  What I have done is make a notebook for each direct line male ancestor.  The naming convention I've used for the notebooks is LAST NAME, First Name Middle Name (Birth Year-Death Year).  Since I'm starting with my paternal grandfather, his notebook would be LUSBY, Clarence Wesley (1913-1966).   Now you may be wondering why I'm only making a notebook for each male direct line ancestor, and that is a good question.  I know that some have one surname folder, and then individual folders for each ancestor with that surname, regardless if they are male or female.  I tried that, but it just got to be too much for me.  Hopefully as I continue showing you how I have this set up, it will make sense to you and answer any questions that may pop up.  After much trial and error, I found that this is the best way that works for me.

I have five notebooks made up already for my direct line ancestors.  I put them in order starting with my father, then going to my paternal grandfather, maternal grandfather, paternal great grandfather, and maternal great grandfather.  Since my dad is still alive, you will notice that I used "Xs" in place for the death date.  I can sort the notebooks anyway I want, so I decided to sort by generation starting with my dad.  I'll explain the Master Notebook Pages later in this post.

Click to view full-sized image.
This second screenshot is of the middle section of the notebook.  This shot is for my paternal grandfather's notebook (LUSBY, Clarence Wesley (1913-1966) so that I can show you how it is set-up.  In fact, all of my notebooks will be set up the same way. You will notice the five colored tabs.  These are like the tab section dividers in an actual notebook, and I have one for each member of this family unit.  When I named the individual tabs, I used First Name, Middle Name, Last Name, except for the wife.  For her tab, I used First Name, Middle Name, Maiden Name.  With regards to the order of the notebook tabs, I always start with the male direct line ancestor, then his wife, then the children in birth order.  To be consistent, the tabs will be colored as follows:  Husband - Silver, Wife - Red Chalk, and Direct Ancestor - Apple Green.  For the other children, I'll let the software select the tab color for now.  I opted to have all my direct ancestors' tab be Apple Green so that it stands out.  This will be helpful for my ancestors that had lots of children.  So by the color of the tabs, you can tell right away that Alan Franklin Lusby is my direct line ancestor.

In the first image, you may have noticed that I had a notebook titled Master Notebook Pages.  This is a notebook of all the individual pages that will be used for each person in a notebook.  I can copy them from the Master Notebook Pages Book to each tabbed person in a notebook. 

Since the list of notebook pages is long, I had to make two screen shots.  This first screen shot shows the page for Birth Records.  You'll notice that I have subpages under Birth Records - one for Church Records and Vital Records.  I wanted to keep records pertaining to a fact together.

Click to view
full-sized image.
Here is a screenshot of the rest of the pages in the Master Notebook.  I also have subpages for quite a few of these pages, and for the same reason as explained above.  Also, the subpages are collapsible.  I just click on the main category, like Birth Records, and the subpages are hidden.

I think I have a notebook page for ever possible records I could discover for my ancestors.  If not, then all I have to do is add another page to the Master Notebook and add that page to the ancestor.  The same goes for adding subpages.  For instance, under Military Records I may decide to add subpages for the following:  Draft Registration, Active Service, Pension.  This is a decision I don't need to make right now, but can make at a later time, then like a regular notebook page, I can add the subpage to the Master Notebook, and copy to the ancestor's notebook.
I really like the flexibility of this software. 

On thing I haven't decided on is whether or note I'll delete any pages that aren't pertinent to that ancestor.  Or should I just keep them knowing they don't/won't hold any information.

Since the title of this blog post is Tracking Research, I'm sure you are wondering where and how I'll be tracking my research using OneNote.  Well here is my plan...on the main page for each category, I have set up a table that is based on Thomas MacEntee's research log.  Since I'll be using Evidentia to evaluate and analyze the sources information gleamed from the document, I didn't need those categories in my research log.  Using the Birth Records notebook page, you can see how I have my research log set up.

Click to view full-sized image.
The categories that I'm using based on Thomas' log are:  Item No., Date of Search, Proof Point, Record Name, Respository, Record Type, Proven?, Image Name, Image Link, and Notes.  This table will adjust it's column widths automatically as I input the data.  

I decided to have individual logs for each research objective that I'm trying to prove because I thought that, for me, one research log for everything pertaining to that particular ancestor, would get to big and cumbersome for me.  I have this same research log on the main page of each notebook category.  It is the same regardless if you are looking at Census Records or Military records.

Click to view full-sized image.
I also copied Thomas' Search Log, and made a separate notebook page for it.  I never tracked my searches before, but maybe this will help keep me from making the same searches over and over, and over again.  I need all the help I can get to make the best use of my time as I can.

Click to view full-sized image.
As with the Search Log, I made a separate notebook page for a To Do List.  I have a To List that I made up that is in my genealogy database, Family Tree Maker 2014.  I quit using it as I didn't find it helpful, or I'd just forget about it.  I'm hoping with having the To Do List in with the rest of my research, it will work better for me.  I pretty much just copied what Thomas graciously shared with us. 

So there you have it...my plan for tracking my research.  I'm hoping that it works that way I think it will, and that because of using this I'll be much more successful in keeping track of my research.  For the last image, here is a screenshot of the notebook for my paternal grandfather.

Click to view full-sized image.

If you have any questions about anything I've discussed in this blog post, please feel to ask and I'll answer.  I have made up other tables for some of the other notebook pages that I didn't show in this post (i.e. Neighborhood Worksheet, Value of Personal & Real Estate, Family Group Sheet, etc.).  If you are curious and want to know, please let me know.  I'm more than happy to share.

Next up is to start conducting some actual research and putting the above to use to see how it works and if some more tweaking is needed.

Saturday, February 7, 2015

Genealogy Do-Over - Week 2: Setting Research Goals & Family Interviews


A way to start your genealogy research over.
At the same time,  you will learn how to build a solid
family tree with good, strong roots.

* * * * * * * * * * * * * * * * * * * * *

With my weekends freed up a bit more now that football season is over, I'm up to the task of continuing on with this Genealogy Do-Over.  With my work schedule, only the weekends provide me with big blocks to time to do this correctly.  Sure, I can try and spend an hour or two each night during the week working on this, but with leaving the house at 5am and getting home between 8pm and 9pm, I just don't think I'd have enough juice in my brain to work on it with a clear head.

The topics for the second week were 1) Setting Research Goals, 2) Conducting a Self Interview, and 3) Conducting Family Interviews.

Now that I'm finished with the Week 1 topic, I'm now ready to continue with Week 2.  The topics for the second week were 1) Setting Research Goals, 2) Conducting a Self Interview, and 3) Conducting Family Interviews.  I worked on these three topics out of order. Below is how I tackled these topics.

Conducting Family Interviews

Besides my parents and a cousin, along with his family, all of my other relatives are on the East Coast.  My sister, brother-in-law, and niece are in Colorado.  With my relatives spread out, doing a face-to-face interview is just about impossible.  So I did some research on what types of questions to ask when conducting this interview, and I made up a document that I will be emailing out to them.  When, and if, I get them back completed, I'll then compile their answers and record them.

Conducting a Self Interview

I did a self interview one night on the ferry going home last week.  Seemed like the perfect times and I did have 35 minutes to get a good start on it.  I pulled out my notebook and starting writing down everything I remembered from my life so far.  I included places I lived, places of employment, trips and vacations, and schools attended and graduated from.  I'm going to organize this information into chronological order and add it to my record in my genealogy database.

Setting Research Goals

I am starting with my grandparents.  Unfortunately, none of them are around any longer, so I missed out on the chance to interview them directly.  I'll have to rely on records and the memories of their children and grandchildren.

I plan on taking one grandparent at a time, and perform an exhaustive search on their life.  I won't move on to the next grandparent until I feel that I have gone as far as I can with what is currently available.

The first grandparent up is my paternal grandfather Clarence Wesley Lusby.  Then I'll move onto my paternal grandmother, Elizabeth Armistead Hennings.  Then it will be time for my maternal grandfather and grandmother, Carl Sporie and Isabella Sharp Tanton.

That is it for this second week.  Up next for Week 3 is 1) Tracking Research, and 2) Conducting Research.

Related Posts Plugin for WordPress, Blogger...