Saturday, February 28, 2015

Genealogy Do-Over - Week 4: Managing Projects & Tasks and Tracking Searches


A way to start your genealogy research over.
At the same time,  you will learn how to build a solid
family tree with good, strong roots.

* * * * * * * * * * * * * * * * * * * * *

After taking last weekend and this past week off from genealogy, I’m now at Week 4 of my Genealogy Do-Over, and the topics for this week are 1) Managing Projects and 2) Tracking Searches.  I’m thinking that this post will be short and sweet, and not much prep work will be required to bring this into my research workflow.

Managing Projects and Tasks

I looked over the Project Management Template that Thomas MacEntee shared with us.  While quite impressive and detailed, I don’t have much of a use for it in my research workflow.  All of my Tasks and To Do’s will be kept and traced in OneNote.

Click to view full-sized image.

Tracking Searches

This was something that I have never done, and to be honest, never thought to do.  I think that I’ll actually find this quite helpful in my research workflow.  I can’t tell you how many times I’ve search for the same information for a particular ancestor over, and over, and over again.  So much wasted research times online and in my local libraries.  As part of Week 3, I created a search log based on the Research Log workbook that Thomas shared with us.  When I started my research back up, I made a point to adding all the search parameters I did to the log.  Now all I have to do is review it each times I start to research, and I’ll know immediately where I left off.

Click to view full-sized image.


Well, that’s it for Week 4.  I told you it would be short and sweet.  Now I’m off to review the handout for Week 5, which includes 1) Building a Research Toolbox and 2) Citing Sources.

Sunday, February 15, 2015

Genealogy Do-Over - Week 3: Conducting Research


A way to start your genealogy research over.
At the same time,  you will learn how to build a solid
family tree with good, strong roots.

* * * * * * * * * * * * * * * * * * * * *

Now that I have my research goals and a way to track them created, I am really excited to get to the second topic for Week 3, which is to actually conduct some research.  It feels like forever since I've been able to search for documents.  Below is my attempt to show how I overhauled my way of conducting research based on what I've learned so far from this Genealogy Do-Over.

Click to view full-sized image.
Beginning with my paternal grandfather, Clarence Wesley Lusby, I am starting with his death, and will then work backwards.  Using Ancestry.com, I clicked on Search and selected Birth, Marriage & Death.  I typed in my search criteria, and hit enter.  Ancestry returned with 61 results.  Since I only wanted information on his death, I drilled the search down further by selecting Death, Burial, Cemetery & Obituaries.  This came back with 20 results in the following categories:  (1) U.S., Find a Grave Index, 1600s-Current; (2) United States Obituary Collection; (3) Historical Newspapers, Birth, Marriage, & Death Announcements, 1851-2003; (4) District of Columbia, Select Deaths and Burials, 1840-1964; (5) Minnesota Cemetery Inscription Index, Select Counties; and (6) U.S. Cemetery and Funeral Home Collection. I took a look into each of these categories, and the only one that provided the information I wanted was #3, which came back with his Obituary that ran for two days in The Washington Post and a Notice of Deaths & Services by the funeral home.

Click to view full-sized image.
I opened the notebook I created for him in OneNote, and clicked on the page for Death Records. On the main Death Record page is where my research log is.  I decided to have a log for each research objective instead of one log for everything.  This log is based on the one that Thomas MacEntee developed for his use and shared with us.  I pulled from his log the items that I thought would be useful for me.  I left out the columns for evaluating and analyzing the documents since I'll be doing that in Evidentia.  The columns that I pulled from Thomas' research log are Item No., Date of Search, Proof Point, Repository, Record Type, Image Name, Image Link, and Notes.

I opened the first obituary and saved it to my computer, then I took a screenshot of it with the OneNote Clipper, and the obit went straight to the Obituary subpage.  When I clipped the image, OneNote automatically added the date and time that the screen clipping was made.  I copied the image URL to OneNote, and I also copied the pertinent information that I will use for a citation.  I repeated the same steps for the other obituary and the death/service notice from the funeral home.

I then went to a few other sites that I have access to and performed the same search, repeating the above as I found information relating to my grandfather's death and/or obituary.

As I researched and found documents, I added the search information to my Research Log that is housed on the main page of Death Records.  Below is a sample of my current Research Log for my grandfather's death.

Click to view full-sized image.


Also, as I performed my searched, I entered the information into my Search Log that I use to keep track of my searches so I that repeat them as I did in the past.  Below is a sample of my current Search Log that I'm using to track all the searches I made that pertained to the death of my grandfather.  You'll noticed that a few of the searches that I made yielded no results.  This isn't to say that I will never return to those sites and do another search.  As the sites are continuously updated, some day I might be able to find something there, so I plan to recheck them every couple of months.

Click to view full-sized image.


Since in all of my searches, I couldn't find his Death Certificate, the last thing I did was go to my To List and enter that into the table.  I left the last two columns (Date Started & Date Completed) blank.  Those will get filled in when I send off the order for the certificate and when I actually receive the certificate.  See below for a sample of my To Do List regarding my grandfather death records.

Click to view full-sized image.
And there you have it.  Since I didn't find a reference to his Social Security Death Index in my searching, I'll have to see how to go about getting it.  I'll add this to my To Do List, and research how to get my hands on it.  But this is basically how I plan to go about my search now.  Much more organized that how I was doing it before, and I am hopeful it will keep me on track and keep me from chasing those bright shiny objects I seem to love so much.

Next up is to continue my research on my grandfather, and to move on to Week 4 of the Genealogy Do-Over which covers Managing Projects and Tasks and Tracking Searches.

Sunday, February 8, 2015

Genealogy Do-Over - Week 3: Tracking Research


A way to start your genealogy research over.
At the same time,  you will learn how to build a solid
family tree with good, strong roots.

* * * * * * * * * * * * * * * * * * * * *

Next up on this Genealogy Do-Over journey is Week 3, which is where we start tracking our research and also start conducting research.  Because both of the topic for this week are going to be lengthy, I've decided that I will make two blog posts about the Week 3 topics.

So first up is tracking my research.  In the past, I have been very lackadaisical when it came to doing this.  Because of this, I can't tell how many times I've gone in search for documents, only to discover that I already had that document saved.  So many wasted hours tracking things down that I already had.  I read all the posts in the Facebook group, along with the blog posts that members posted about how they were setting themselves up to be successful at tracking their research.  So many good ideas to try out and see how they'd work for me.

Knowing myself how how my brain likes to work, I've decided to have all of my research in one place - Microsoft OneNote will become my research log.  That way, I don't have to have lots of different documents/spreadsheets for doing various things.  That is a good way for me to lose something, or just get frustrated and lose interest in using those tools.

Here is how I have OneNote set up.  I'm sure that as I actually get back to conducting actual research, I'll be doing some tweaking here and there.  The importing thing is that I have the basic structure set up, and I'd like to share that with all of you.  

I'm going to give you three separate screen shots of the main screen from OneNote to show you how I have my system set up.  Then I'll show you a shot of the entire mail page.

This first shot shows the individual notebooks I have set up so far.  What I have done is make a notebook for each direct line male ancestor.  The naming convention I've used for the notebooks is LAST NAME, First Name Middle Name (Birth Year-Death Year).  Since I'm starting with my paternal grandfather, his notebook would be LUSBY, Clarence Wesley (1913-1966).   Now you may be wondering why I'm only making a notebook for each male direct line ancestor, and that is a good question.  I know that some have one surname folder, and then individual folders for each ancestor with that surname, regardless if they are male or female.  I tried that, but it just got to be too much for me.  Hopefully as I continue showing you how I have this set up, it will make sense to you and answer any questions that may pop up.  After much trial and error, I found that this is the best way that works for me.

I have five notebooks made up already for my direct line ancestors.  I put them in order starting with my father, then going to my paternal grandfather, maternal grandfather, paternal great grandfather, and maternal great grandfather.  Since my dad is still alive, you will notice that I used "Xs" in place for the death date.  I can sort the notebooks anyway I want, so I decided to sort by generation starting with my dad.  I'll explain the Master Notebook Pages later in this post.

Click to view full-sized image.
This second screenshot is of the middle section of the notebook.  This shot is for my paternal grandfather's notebook (LUSBY, Clarence Wesley (1913-1966) so that I can show you how it is set-up.  In fact, all of my notebooks will be set up the same way. You will notice the five colored tabs.  These are like the tab section dividers in an actual notebook, and I have one for each member of this family unit.  When I named the individual tabs, I used First Name, Middle Name, Last Name, except for the wife.  For her tab, I used First Name, Middle Name, Maiden Name.  With regards to the order of the notebook tabs, I always start with the male direct line ancestor, then his wife, then the children in birth order.  To be consistent, the tabs will be colored as follows:  Husband - Silver, Wife - Red Chalk, and Direct Ancestor - Apple Green.  For the other children, I'll let the software select the tab color for now.  I opted to have all my direct ancestors' tab be Apple Green so that it stands out.  This will be helpful for my ancestors that had lots of children.  So by the color of the tabs, you can tell right away that Alan Franklin Lusby is my direct line ancestor.

In the first image, you may have noticed that I had a notebook titled Master Notebook Pages.  This is a notebook of all the individual pages that will be used for each person in a notebook.  I can copy them from the Master Notebook Pages Book to each tabbed person in a notebook. 

Since the list of notebook pages is long, I had to make two screen shots.  This first screen shot shows the page for Birth Records.  You'll notice that I have subpages under Birth Records - one for Church Records and Vital Records.  I wanted to keep records pertaining to a fact together.

Click to view
full-sized image.
Here is a screenshot of the rest of the pages in the Master Notebook.  I also have subpages for quite a few of these pages, and for the same reason as explained above.  Also, the subpages are collapsible.  I just click on the main category, like Birth Records, and the subpages are hidden.

I think I have a notebook page for ever possible records I could discover for my ancestors.  If not, then all I have to do is add another page to the Master Notebook and add that page to the ancestor.  The same goes for adding subpages.  For instance, under Military Records I may decide to add subpages for the following:  Draft Registration, Active Service, Pension.  This is a decision I don't need to make right now, but can make at a later time, then like a regular notebook page, I can add the subpage to the Master Notebook, and copy to the ancestor's notebook.
I really like the flexibility of this software. 

On thing I haven't decided on is whether or note I'll delete any pages that aren't pertinent to that ancestor.  Or should I just keep them knowing they don't/won't hold any information.

Since the title of this blog post is Tracking Research, I'm sure you are wondering where and how I'll be tracking my research using OneNote.  Well here is my plan...on the main page for each category, I have set up a table that is based on Thomas MacEntee's research log.  Since I'll be using Evidentia to evaluate and analyze the sources information gleamed from the document, I didn't need those categories in my research log.  Using the Birth Records notebook page, you can see how I have my research log set up.

Click to view full-sized image.
The categories that I'm using based on Thomas' log are:  Item No., Date of Search, Proof Point, Record Name, Respository, Record Type, Proven?, Image Name, Image Link, and Notes.  This table will adjust it's column widths automatically as I input the data.  

I decided to have individual logs for each research objective that I'm trying to prove because I thought that, for me, one research log for everything pertaining to that particular ancestor, would get to big and cumbersome for me.  I have this same research log on the main page of each notebook category.  It is the same regardless if you are looking at Census Records or Military records.

Click to view full-sized image.
I also copied Thomas' Search Log, and made a separate notebook page for it.  I never tracked my searches before, but maybe this will help keep me from making the same searches over and over, and over again.  I need all the help I can get to make the best use of my time as I can.

Click to view full-sized image.
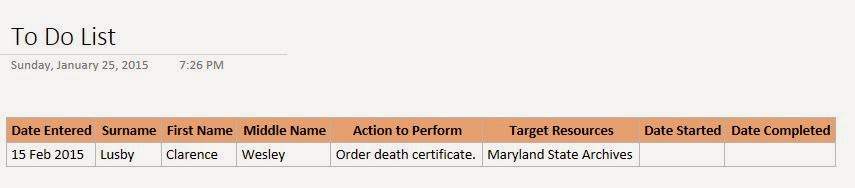
As with the Search Log, I made a separate notebook page for a To Do List.  I have a To List that I made up that is in my genealogy database, Family Tree Maker 2014.  I quit using it as I didn't find it helpful, or I'd just forget about it.  I'm hoping with having the To Do List in with the rest of my research, it will work better for me.  I pretty much just copied what Thomas graciously shared with us. 

So there you have it...my plan for tracking my research.  I'm hoping that it works that way I think it will, and that because of using this I'll be much more successful in keeping track of my research.  For the last image, here is a screenshot of the notebook for my paternal grandfather.

Click to view full-sized image.

If you have any questions about anything I've discussed in this blog post, please feel to ask and I'll answer.  I have made up other tables for some of the other notebook pages that I didn't show in this post (i.e. Neighborhood Worksheet, Value of Personal & Real Estate, Family Group Sheet, etc.).  If you are curious and want to know, please let me know.  I'm more than happy to share.

Next up is to start conducting some actual research and putting the above to use to see how it works and if some more tweaking is needed.

Saturday, February 7, 2015

Genealogy Do-Over - Week 2: Setting Research Goals & Family Interviews


A way to start your genealogy research over.
At the same time,  you will learn how to build a solid
family tree with good, strong roots.

* * * * * * * * * * * * * * * * * * * * *

With my weekends freed up a bit more now that football season is over, I'm up to the task of continuing on with this Genealogy Do-Over.  With my work schedule, only the weekends provide me with big blocks to time to do this correctly.  Sure, I can try and spend an hour or two each night during the week working on this, but with leaving the house at 5am and getting home between 8pm and 9pm, I just don't think I'd have enough juice in my brain to work on it with a clear head.

The topics for the second week were 1) Setting Research Goals, 2) Conducting a Self Interview, and 3) Conducting Family Interviews.

Now that I'm finished with the Week 1 topic, I'm now ready to continue with Week 2.  The topics for the second week were 1) Setting Research Goals, 2) Conducting a Self Interview, and 3) Conducting Family Interviews.  I worked on these three topics out of order. Below is how I tackled these topics.

Conducting Family Interviews

Besides my parents and a cousin, along with his family, all of my other relatives are on the East Coast.  My sister, brother-in-law, and niece are in Colorado.  With my relatives spread out, doing a face-to-face interview is just about impossible.  So I did some research on what types of questions to ask when conducting this interview, and I made up a document that I will be emailing out to them.  When, and if, I get them back completed, I'll then compile their answers and record them.

Conducting a Self Interview

I did a self interview one night on the ferry going home last week.  Seemed like the perfect times and I did have 35 minutes to get a good start on it.  I pulled out my notebook and starting writing down everything I remembered from my life so far.  I included places I lived, places of employment, trips and vacations, and schools attended and graduated from.  I'm going to organize this information into chronological order and add it to my record in my genealogy database.

Setting Research Goals

I am starting with my grandparents.  Unfortunately, none of them are around any longer, so I missed out on the chance to interview them directly.  I'll have to rely on records and the memories of their children and grandchildren.

I plan on taking one grandparent at a time, and perform an exhaustive search on their life.  I won't move on to the next grandparent until I feel that I have gone as far as I can with what is currently available.

The first grandparent up is my paternal grandfather Clarence Wesley Lusby.  Then I'll move onto my paternal grandmother, Elizabeth Armistead Hennings.  Then it will be time for my maternal grandfather and grandmother, Carl Sporie and Isabella Sharp Tanton.

That is it for this second week.  Up next for Week 3 is 1) Tracking Research, and 2) Conducting Research.

Related Posts Plugin for WordPress, Blogger...